Setting conditions for actions
You can set conditions to control when actions in your process management are available. This allows you to display different actions when necessary, giving you more flexibility in your workflow.
Configure the Conditions to take this action settings to make sure that the right actions are performed at the appropriate time in your workflow.
Examples of setting conditions for actions
Here are some examples of when you might want to use action conditions.
-
When you want to have different actions depending on the amount entered in an expense reimbursement request
Let's say you have an app for requesting expense reimbursements, where amounts under 1,000 USD need to be approved by a manager, and amounts of 1,000 USD or more require approval from a director. To allow for this, you can display different action buttons based on the reimbursement amount.
Displaying only the relevant action button based on a field value helps ensure that approvals follow the correct workflow. -
When you don't want to display an action button until an approval comment has been entered
You can configure an action button to appear only when a specific field is not empty. For example, this can be used to ensure that an approver has entered a comment like "Approved" or "Confirmed" in line with your workflow.
By not allowing the workflow to be advanced until a comment is entered, you can prevent the step from being skipped and make your workflow easier to manage.
Steps
As an example of how to use conditions for actions, the following steps show how to configure the following conditions for an expense reimbursement app.
- Status: Before applying
- Conditions:
- Manager approval required if reimbursement amount is less than 1,000 USD
- Director approval required if reimbursement amount is 1,000 USD or more
- Conditions:
- Status: Pending director approval
- Condition: Comment has been entered by approver
-
Open the Process management screen in the app where you want to configure the process.
-
Configure the Conditions to take this action setting for the branching actions.
In this example, we want to set conditions based on the entered reimbursement amount. We'll configure the following conditions for the "Before applying" status.- The "Expense" field is greater than or equal to 1,000
- The "Expense" field is less than or equal to 999

-
Configure the Conditions to take this action setting for the action to be displayed when a comment has been entered.
In this example, we'll configure the following condition for the "Pending director approval" status.- The "Approver comment" field is not equal to an empty value
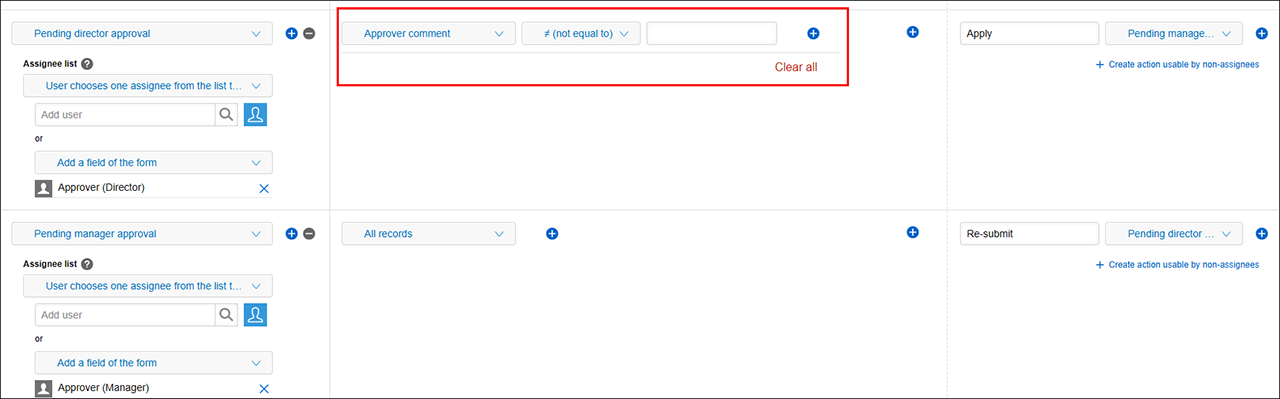 When the Conditions to take this action setting is configured, the action associated with it will not be displayed until a set condition is met.
In this example, the "Approve" button will not be displayed during the "Pending director approval" status until the "Approver comment" field has been filled in.